Arduino Water Leak Detection System using Water Sensor and Buzzer
Overview
Introduction
Water leakage and overflow can cause serious damage in homes, laboratories, and industrial environments. To prevent such issues, a simple water leak detection system can be built using an Arduino Uno, a water sensor module, and a buzzer.
This project detects the presence of water using a sensor and triggers an audible alarm when water is detected. It is a beginner-friendly electronics and IoT project that helps students understand analog sensor readings, threshold detection, and actuator control using Arduino.
Components Used
The following hardware components are required to build this project:-
Arduino Uno
-
Water Sensor Module
-
Active Buzzer
-
Jumper Wires
-
USB Cable (for power and programming)
Working Principle
The water sensor module works based on the principle of conductivity. The sensor board contains multiple exposed conductive traces. When water touches these traces, it creates a conductive path between them.
This changes the electrical resistance of the circuit and produces a variable analog voltage output. The Arduino reads this analog signal through an analog input pin (A0).
When the detected value exceeds a predefined threshold, the Arduino activates the buzzer, which alerts the user that water has been detected.
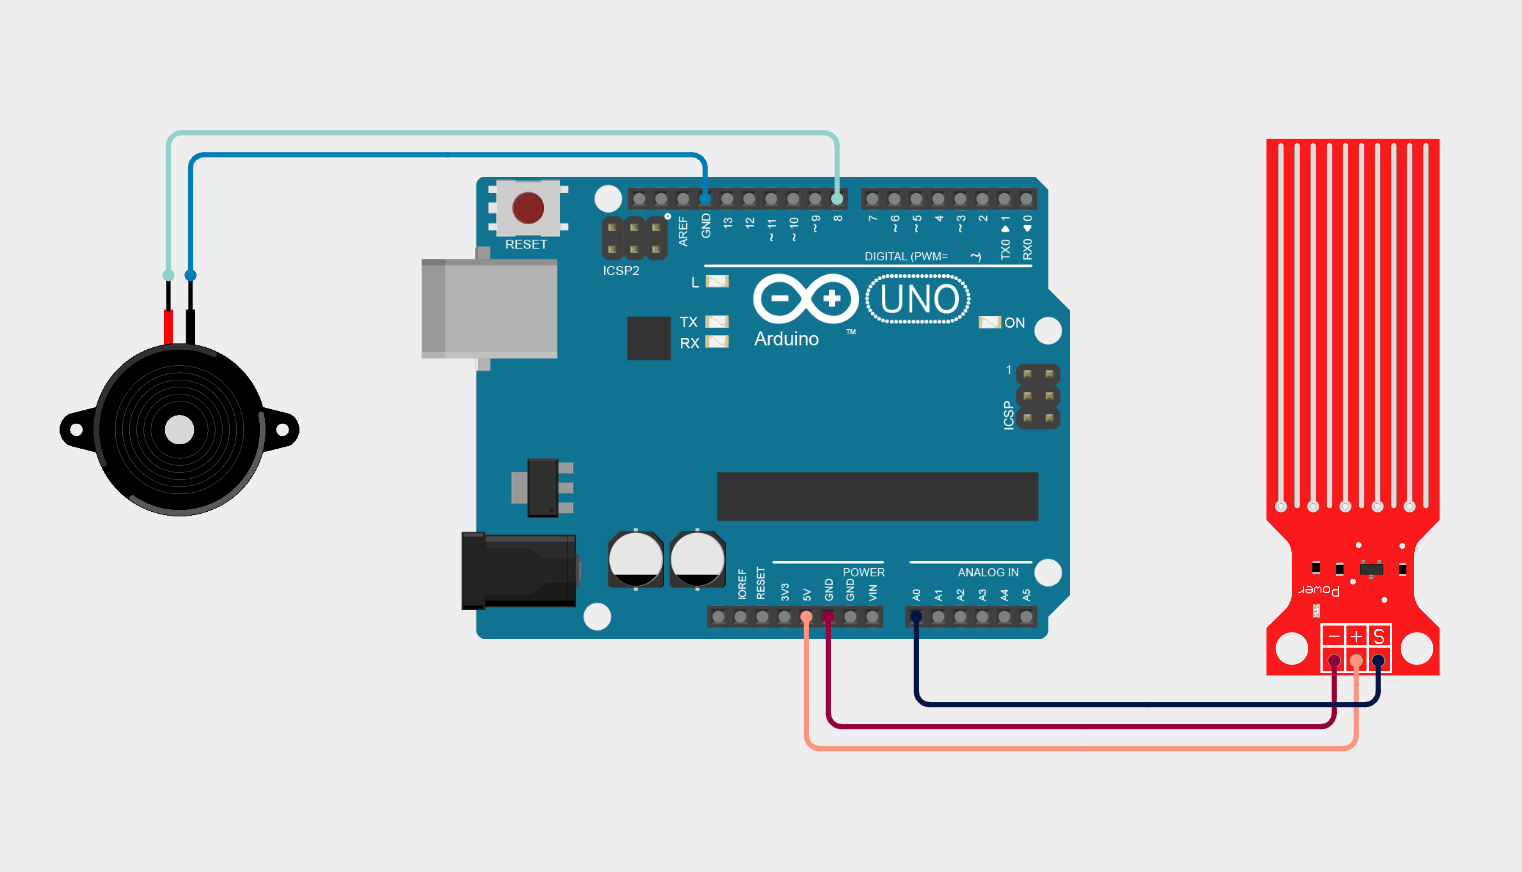
Circuit Connections
The system is connected as follows:Water Sensor Connections
| Sensor Pin | Arduino Pin |
|---|---|
| VCC | 5V |
| GND | GND |
| Signal (S) | A0 |
Buzzer Connections
| Buzzer Pin | Arduino Pin |
|---|---|
| Positive (+) | Digital Pin 8 |
| Negative (-) | GND |
-
The sensor continuously sends analog values to Arduino.
- Arduino processes these values.
-
If water is detected, the buzzer is activated.
Arduino Program Explanation
The following Arduino code is used to implement the detection logic:Code Breakdown

1. Pin Definitions
int buzzerPin = 8;
-
A0 is used to read the analog output from the water sensor.
-
Pin 8 controls the buzzer.
2. Threshold Value
The threshold value determines the sensitivity of the water detection.
- Lower value → more sensitive detection
- Higher value → less sensitive detection
3. Setup Function
pinMode(buzzerPin, OUTPUT);
Serial.begin(9600);
}
-
The buzzer pin is configured as an output pin.
-
Serial communication is initialized to monitor sensor values using the Serial Monitor.
4. Reading Sensor Data
The Arduino reads an analog value between 0 and 1023 from the water sensor.
-
0 – 100 → No water detected
-
Above threshold → Water detected
5. Triggering the Alarm
digitalWrite(buzzerPin, HIGH);
}
else {
digitalWrite(buzzerPin, LOW);
}
-
The buzzer turns ON, indicating water presence.
-
The buzzer remains OFF.
6. Delay for Stability
System Operation
- The water sensor continuously monitors moisture or water presence.
- The sensor sends analog data to the Arduino.
- Arduino compares the sensor value with the threshold.
- If water is detected:
- The buzzer is activated.
- If no water is present:
- The buzzer remains off.
Applications
This project can be used in several practical applications:-
Water leak detection systems
-
Basement flood alerts
-
Water tank overflow alarms
-
Smart irrigation monitoring
-
Industrial liquid level monitoring
Advantages
1. Low Cost Implementation
One of the biggest advantages of this system is its low cost. The components used in the project—such as an Arduino Uno, a water sensor module, and a buzzer—are inexpensive and easily available in the market.
Because of this affordability, the system is ideal for:
- Educational laboratories
- Student projects
- DIY electronics learning
Even beginners can build this system without requiring expensive equipment.
2. Simple Circuit Design
The system uses very few components, which makes the circuit simple and easy to assemble.
The main components include:
- Arduino microcontroller
- Water detection sensor
- Buzzer alarm
Due to the minimal wiring and straightforward connections, the project is suitable for students who are learning embedded systems or Arduino programming for the first time.
3. Real-Time Water Detection
The system continuously monitors the sensor readings through the analog input of the Arduino. Whenever water comes into contact with the sensor:
- The sensor value increases.
- The Arduino compares the value with the threshold.
- The buzzer immediately activates.
This enables real-time detection of water leakage or overflow, allowing users to respond quickly and prevent damage.
4. Easy to Customize and Expand
Another advantage of this system is its high flexibility. Since it is built using Arduino, additional features can be easily added to improve functionality.
For example, the system can be expanded by adding:
-
LCD display to show sensor values
-
WiFi module (ESP8266 / ESP32) for remote monitoring
-
SMS alert module (GSM module)
-
Mobile application notifications
-
LED indicators for visual alerts
This makes the system highly scalable for more advanced projects.
5. Useful for Safety and Prevention
Water leakage can cause serious problems such as:
- Electrical short circuits
- Property damage
- Equipment failure
By installing this detection system in areas like basements, water tanks, bathrooms, kitchens, or industrial facilities, users can receive an early warning and prevent costly damage.
6. Helps Students Learn Embedded Systems
This project is widely used in engineering and electronics education because it demonstrates several important concepts, such as:
- Analog sensor interfacing
- Threshold detection
- Microcontroller programming
- Actuator control (buzzer)
Through this project, students gain practical knowledge of embedded systems and sensor-based automation.
Disadvantages
1. Limited Detection Accuracy
The water sensor used in this project works based on electrical conductivity. While this method is simple, it may not always provide highly accurate results.
Factors that affect accuracy include:
- Dust or contamination on the sensor
- Humidity in the environment
- Mineral content in water
Because of this, the sensor may sometimes produce false readings or inconsistent values.
2. Sensor Corrosion Over Time
Water sensors typically use exposed copper traces to detect conductivity. When these traces come into repeated contact with water, corrosion may occur.
Over time, corrosion can lead to:
- Reduced sensitivity
- Inaccurate readings
- Sensor failure
This means the sensor may require periodic replacement or maintenance.
3. No Remote Monitoring in Basic Design
In the basic version of this system, the buzzer alarm only provides local notification.
This means the user must be physically present near the system to hear the alert. If water leakage occurs when no one is nearby, the warning may go unnoticed.
To overcome this limitation, additional modules such as WiFi or GSM communication modules must be integrated.
4. Limited Detection Area
The sensor can only detect water in the immediate area where it is placed. If water leakage occurs at a different location that is not covered by the sensor, the system will not detect it.
For large spaces or buildings, multiple sensors may be required to ensure complete monitoring.
5. Power Dependency
The system relies on continuous power supply from the Arduino board. If the power supply fails:
- The sensor stops monitoring
- The buzzer cannot trigger an alarm
Therefore, in critical applications, it may be necessary to include battery backup systems.
Possible Improvements
This system can be further enhanced by adding:-
LCD display for water level monitoring
-
WiFi module (ESP8266) for remote alerts
-
SMS notification system
-
Mobile app monitoring
Administrator
User Reviews & Comments
Share your experience with this IoT Blog. Your feedback helps our community make informed decisions!
Share Your Experience
Help others by sharing your thoughts about this IoT Blog.
Related Blogs
Explore more IoT Blogs in the same category
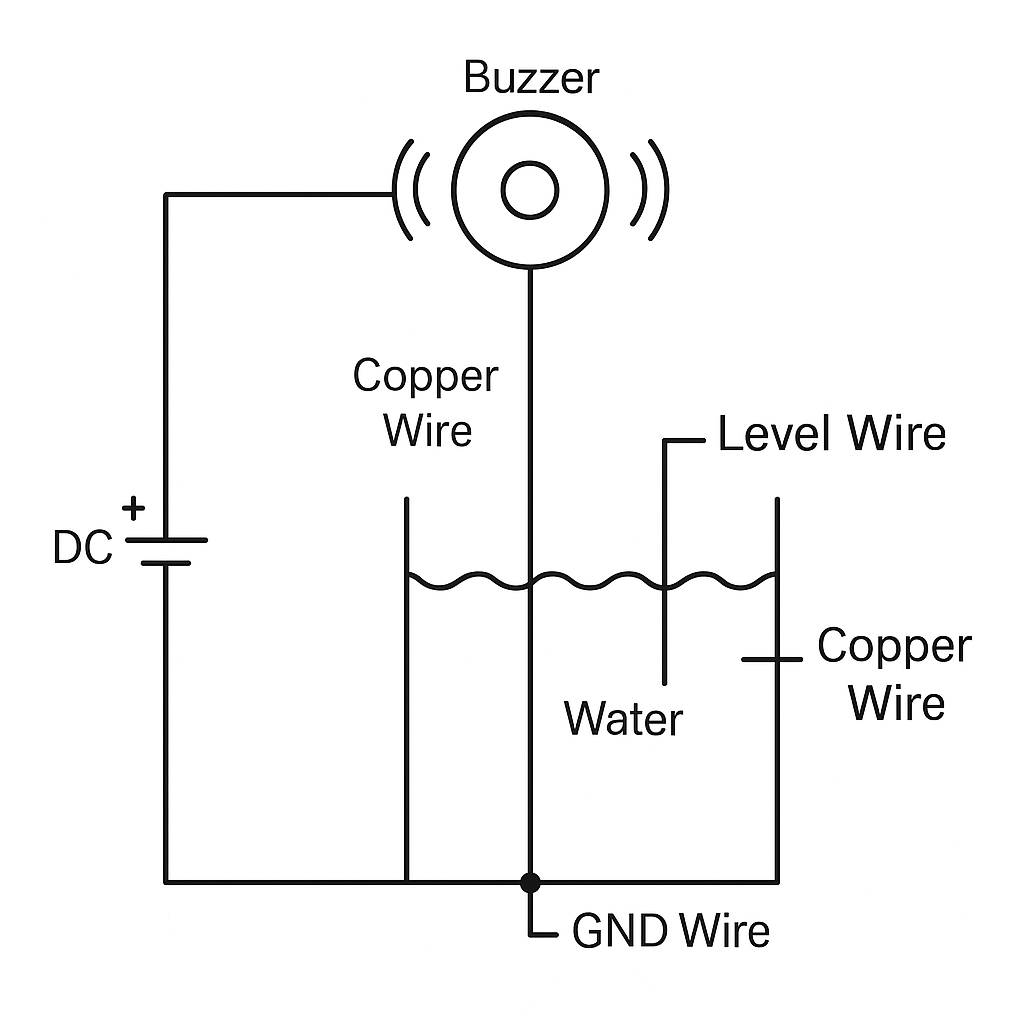
DIY Water Tank Full Alarm Using Copper Wire | No Arduino, No Sensor – Low Cost Project
Homemade Projects
Learn how to make a DIY water tank full alarm using copper wire without Arduino or any sensor. This low-cost homemade water level indicator project helps you prevent tank overflow with a simple circuit using just a buzzer and copper wires.
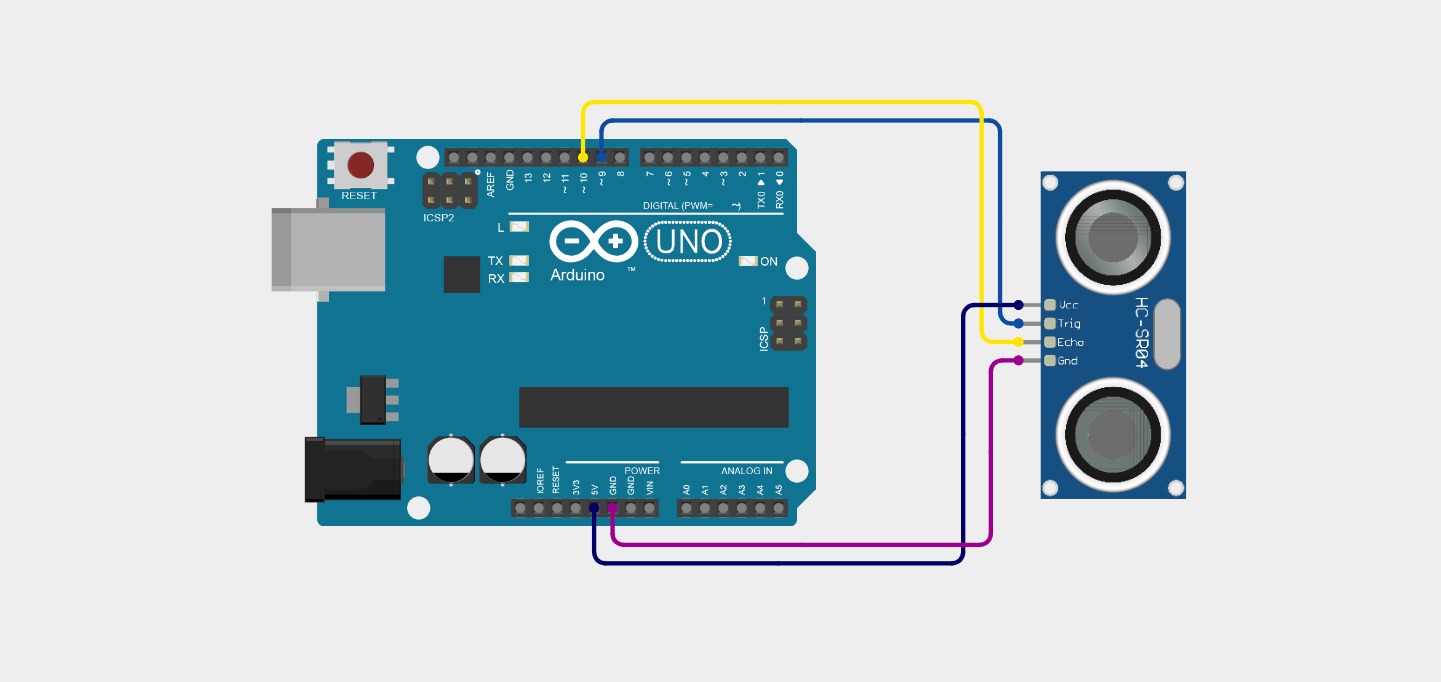
Ultrasonic Distance Measurement Project Using Arduino
Homemade Projects
Ultrasonic distance measurement using Arduino and the HC-SR04 sensor to detect how far an object is from the sensor. This project demonstrates real-time distance calculation using sound waves and Arduino programming.
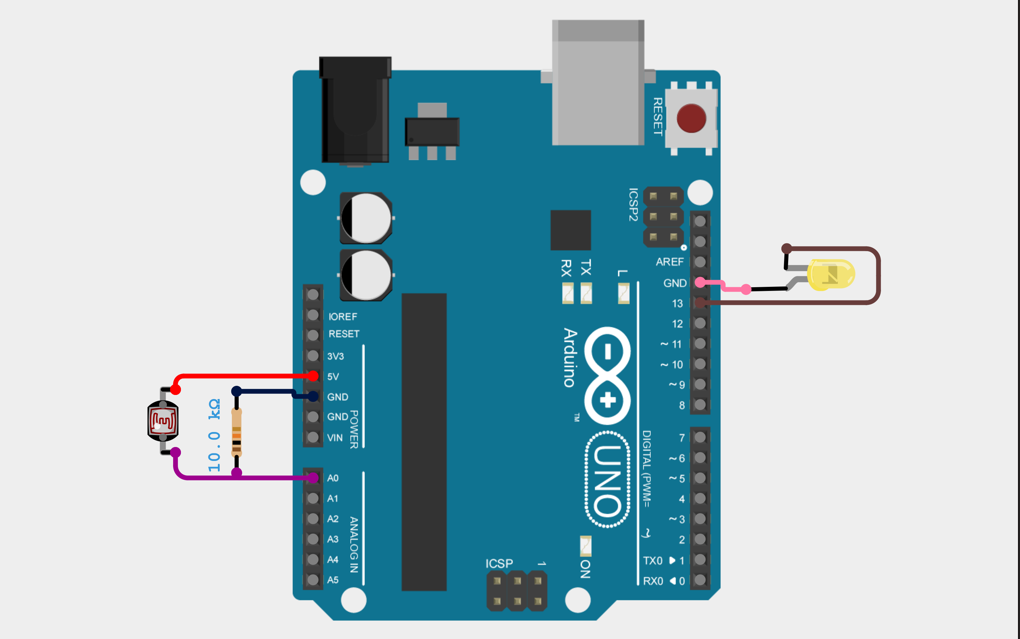
Arduino LDR-Based Automatic Light Control System
Homemade Projects
Automatic light control using Arduino and LDR detects ambient light intensity and automatically switches a light source ON in darkness and OFF in brightness, ensuring energy efficiency and reducing manual effort.
No Reviews Yet
Be the first to share your experience with this IoT Blog!